Now, on to my first real attempt at character development. I'm pretty excited.

Wednesday, February 13, 2008
Sunday, February 3, 2008
Ball bounces
Anybody else having trouble with youtube having insane upload times? It finally dawned on me that blogger has it's own video uploader stuff. Long story short, I meant to get these up sooner. Here's some of the stuff I've been working on in Traditional Animation. I figured I'd omit the plan bounces.
Monday, January 14, 2008
My winter break: now online
I'm long overdue for a blog entry, there's been lots of things I've wanted to share but until today there was nothing I had to share. So I've taken a break from homework to promote the 2009 Ford F150. Why? because I spent many hours over winter break creating a full-sized, horizon to horizon dirt environment for the launch site's exterior 360:
http://www.fordvehicles.com/2009f150/
It bums me out to see how compressed the images are. The irony is I was trying so hard to keep the displaced dirt from being affected by low-resolution artifacts, that I had to save the layered source file out into multiple parts because photoshop can't save files bigger than 2 GB. Oh well, it's probably not that noticeable if you didn't spend a lot of time perfecting things with the art director. It was a fun project, I've gotta admit.
p.s. it looks better on a non-blown-out macbook monitor.
Monday, December 10, 2007
The boat project
So after a month of work we finally got to racing our boats this past Sunday. I thought I'd take the time to reflect and share some pictures.
Our task was to create a boat which we could get in and race, using only a 4'x8' sheet of plywood, two 8' 2"x4"s, sixty feet of duct tape, and as much paint as needed. Like a lot of my projects for 3d design I incorporated the computer in my design. The added bonus for this particular project was that I could not only use the computer to calculate the volume (to find the buoyancy force) and surface area ( to keep it within the plywood limit), but I could also layout my cuts and get a sense of it's center of mass and balance. This allowed me to go many designs past my initial design and create a much more functional boat.
There is a down side to the digital preparation, that's the precision needed to create it's real world replica. Yes, I can pull the lengths, angles of pieces and angles of cuts off the computer, however, all the triangles required trig to correctly layout and measurements accurate to the 32nd of an inch. To make things more complicated, there are two additional measurement layers in this layout file. One for the angle of the corners and another for the angles at which to make the cuts. Green pieces are surfaces facing the inside of the boat, while red pieces are the outer faces. So when cutting these with the circular saw, if there was an angle to be cut it had to be cut with a green piece on the right and a red one on the left to assure the angles would assemble correctly.
 Aside from precision another problem as you might have guessed, is that it's hard to expect group members to decipher such a system and to approach cuts in the same precise manner as one another. So, this is how I spent a vast majority of my thanksgiving break, and took much of the assembly on myself, not because they didn't want to help, but because it would have been difficult to pull them into a work flow I unintentionally created. Fortunately as the construction came to a close I could bring them more into it's assembly and completion so hopefully they can feel like it's as much their boat as it is mine, and I think they do.
We felt, because of it's primitive, triangular, digital look, it was appropriate for our boat to have a starfox themed paint job. After the primer had been added, our tests completed and minor touch ups and revisions made, we spent the night before the race finalizing our paint job.
 On the day of the race we were still unclear about who would row. me at 205 lbs with a fairly strong and experienced row (I like renting row boats when I go fishing) or Tingting, who's roughly half my weight, has less rowing experience and strength but has considerably more space in the boat. Since we never had a chance to test the boat with the oars I took to the water a few minutes before our race to see if I'd have enough room next to my knees to row. It worked, and while there were minor hang ups during the race from the oars crowding me, we did well. We didn't win but our boat definitely proved to be a very steady and reliable design, which is a victory on it's own.
Throughout the creation of the boat I had talked about how much weight it could potentially hold and how it could easily hold both the girls in our group. So after the race we gave it a try and not only could they easily fit, but the weight distribution was even better than if there were only one person.
The boat project was a great conclusion to the semester. It's one of those things you see as being within reach, but would never actually do. So I'm glad we had an assignment to make us give it a try. As always it was great to see something I created in the computer come to life, to see that I'm still in touch with my math/science side., and to have worked with different people. I'm excited to use what I learned on this project to complete some simple wood furniture in the near future.
Our task was to create a boat which we could get in and race, using only a 4'x8' sheet of plywood, two 8' 2"x4"s, sixty feet of duct tape, and as much paint as needed. Like a lot of my projects for 3d design I incorporated the computer in my design. The added bonus for this particular project was that I could not only use the computer to calculate the volume (to find the buoyancy force) and surface area ( to keep it within the plywood limit), but I could also layout my cuts and get a sense of it's center of mass and balance.
 This allowed me to go many designs past my initial design and create a much more functional boat.
There is a down side to the digital preparation, that's the precision needed to create it's real world replica. Yes, I can pull the lengths, angles of pieces and angles of cuts off the computer, however, all the triangles required trig to correctly layout and measurements accurate to the 32nd of an inch. To make things more complicated, there are two additional measurement layers in this layout file. One for the angle of the corners and another for the angles at which to make the cuts. Green pieces are surfaces facing the inside of the boat, while red pieces are the outer faces. So when cutting these with the circular saw, if there was an angle to be cut it had to be cut with a green piece on the right and a red one on the left to assure the angles would assemble correctly.
 Aside from precision another problem as you might have guessed, is that it's hard to expect group members to decipher such a system and to approach cuts in the same precise manner as one another. So, this is how I spent a vast majority of my thanksgiving break, and took much of the assembly on myself, not because they didn't want to help, but because it would have been difficult to pull them into a work flow I unintentionally created. Fortunately as the construction came to a close I could bring them more into it's assembly and completion so hopefully they can feel like it's as much their boat as it is mine, and I think they do.
We felt, because of it's primitive, triangular, digital look, it was appropriate for our boat to have a starfox themed paint job. After the primer had been added, our tests completed and minor touch ups and revisions made, we spent the night before the race finalizing our paint job.

 On the day of the race we were still unclear about who would row. me at 205 lbs with a fairly strong and experienced row (I like renting row boats when I go fishing) or Tingting, who's roughly half my weight, has less rowing experience and strength but has considerably more space in the boat. Since we never had a chance to test the boat with the oars I took to the water a few minutes before our race to see if I'd have enough room next to my knees to row. It worked, and while there were minor hang ups during the race from the oars crowding me, we did well. We didn't win but our boat definitely proved to be a very steady and reliable design, which is a victory on it's own.
Throughout the creation of the boat I had talked about how much weight it could potentially hold and how it could easily hold both the girls in our group. So after the race we gave it a try and not only could they easily fit, but the weight distribution was even better than if there were only one person.

The boat project was a great conclusion to the semester. It's one of those things you see as being within reach, but would never actually do. So I'm glad we had an assignment to make us give it a try. As always it was great to see something I created in the computer come to life, to see that I'm still in touch with my math/science side., and to have worked with different people. I'm excited to use what I learned on this project to complete some simple wood furniture in the near future.
Friday, November 16, 2007
Up to Speed (pt. 2)
So in my very first post I talked about how I got into 3d animation and how I got into Ringling. Due to a lack of new and concrete artistic developments, I thought I'd take this time to share a few of the projects I completed in the time between submitting my art school applications and the next fall.
It's no secret that I'm a huge fan of Futurama. However I rarely have a chance to make my love of photography public (go on, check out my facebook albums, indulge me, I spend a lot of time on that stuff). That and my love for technical experimentation lead me to this toy around with HDRI's (High Dynamic Range Imaging) and capturing an environment.
 In this experiment I photographed a table in my room, then took a picture of a reflective sphere at 3 different exposures. This allowed me to create a panoramic HDRI. I then dusted off my bender model, redid his materials and threw him in a scene with the hdri panorama. Thus the lighting and reflections were practically identical. This was also the first time I really toyed with compositing on my own.
I can accept that I didn't make sophomore status, my tradition work needs a lot of work and even now I'm too embarrassed to share my more recent pieces. Still I must admit it's frustrating when I hear about some of the sophomore assignments and it dawns on me that they're doing things I'd done months, in some cases, years before and just for fun.
This piece was a promo I did for work one weekend. It was one of the only animations I've done for Stage 3 and (outside of the modeling the exterior of the tire) I'm lucky enough to say I handle all aspects of this piece. Taking a different approach to setting it up, I was also extremely happy with how fast it came together, this turned out to be a weekend job.
The next piece, a more obvious bouncing ball-type project, was an experiment I did with multi pass rendering while on the clock at Stage 3 (hence the stage 3 branding). The idea is to be more efficient by rendering out different layers such as the color , reflectivity, shadow and so on. The layers could then be comped in Combustion to make a lot of imediate tweaks(as you would in photoshop) as opposed to rendering, adjusting, re-rendering, re-adjusting, etc... Additionally the background is only rendered once and the motion blur can be added in post, instead of boosting render time.
Again a weekend project that came together surprisingly quick. I've got a few new comparable projects on my scope. Hopefully I can get them to come together as painless as those.
Finally, I'd aways been a goal of mine to create Hobbes in 3d. After toying around with fur for a potential tiger bid, I decided to modify it to fulfill that goal. Additionally, I took screen shots during the process, so I leave you with the modeling of Hobbes in 3ds max:
Tuesday, November 6, 2007
Toy Project
So here's the final model and animation I created of our toy cat for 3d design. My partner handled making the physical model and it's box... I'll see about getting a picture of that...
I rendered it out a a resolution the mac book would enjoy...

As you can see (assuming you saw earlier posts), I ended up remodeling the whole body to closer resemble the model my partner made. The texture was also made to mimic the way the physical model was painted.
Since I've been poly modeling for awhile I spent a good amount of time giving some sophomores advice on their penguins. I noticed pretty much all of the models (including the one in the example they had) had more geometry than what was needed. It's tough to really modify and improve a model, your own or another's, when it's so dense.
I thought I'd use this model as a way to provide some advice.
If it's a simple model, Keep it simple. Extra edges turns models blocky; when you want to move a feature or a side you'll have to move 40 verts at once and try to smooth them out afterwards when it's a feature that could have been created and controlled by 4 verts. The more verts, the less influence each one has. Of course it takes a lot of practice to start developing tricks and techniques but so much of it comes from the initial approach.
 I stumbled across some thumbnails I did that got me started on this model. I just tried to create lines that flowed with the features and try to stitch it together with 4 sided polys. Of course, I changed things as I was working but generally I tried to keep it just as simple. You'll notice in this model there's a lot of areas where 3 or 5 quads meet at a point (so the edges form a 3 or 5 lined asterisk), I should mention, if you're making blend shapes and animating a face, avoid those unless it you know it's necessary. Generally, if those verts are moved in animation they don't provide natural looking deformations.
 Just keep it simple.
...and with time you'll begin to love poly modeling. Then you can take it in mudbox and make it complicated.
Thursday, November 1, 2007
3D Design - Catch Up
My partner and I presented our toy cat this morning for 3D Design. It turned out very well, I didn't do much outside of pitching the idea and modeling/animating the cat in 3d (my partner was really proactive). I'll see about getting my portion of the project online to share. Until then I thought I might share some of the earlier projects I completed for that class.
 This is one of three designs I did for our line project. It's suppose to represent a word that describes ourselves. Can you guess this one? Disregard the phallic semblance (unfortunately my camera angle doesn't do much to diminish the initial impression)
The next project was our modular unit, just a compilation of simple shapes to create a visually appealing structure. I decided it'd be a good opportunity for me to toy around with Maya, primitive shapes and basic poly editing. I also learned to do basic uv unwrapping so I could determine a good was to layout the figure. You better believe it became quite meticulous when I started plotting the cut marks on the poster board I was using. Next time I'll scale them appropriately in photoshop and print up some stencils.


 More recently we had a self-portrait due. It had to have something to do with our majors so I decided to simply paper mache a figure with some of the most influential movies, TV shows and comic strips that inspired me to become a Computer Animator.
The gesture itself was very important so I spent a lot of time on the general shape of the wire frame. I think it was my first time paper macheing since about second grade. To be honest I like the wire version better but the images had to be added to personalize it.
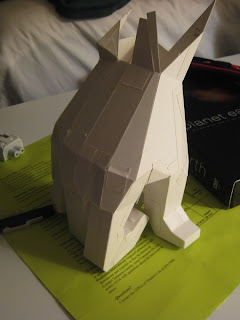
During the same 3 week time frame we also had to complete a life size gesture composed only of planes and edges. I'd thought about taking the Maya approach but fear of using the computer as an unnecessary crutch caused me to stray from the digital. It was still quite tedious and again, I think it would have been wise if I'd done it in Maya and printed up the scaled UVs. Oh well, I'm satisfied with the result.
It really doesn't seem like much work but man, were these projects time consuming. This class has definitely requested a majority of my attention this semester. Now we've got the infamous boat project to start thinking about...
Subscribe to:
Posts (Atom)